Getting started with Game Development using Unity
- Abhishek Jathan
- Aug 1, 2023
- 11 min read

Every person at some point in their lives think, " Oh! Maybe I should learn to make games!!It'll be Fun!!". Don't worry, I got you covered. Let's Begin.
There are many ways to make games. You could learn C++ and build a game entirely from scratch which would at some point drive you nuts if you're new to this. The nicer alternative is to use a game engine to build games. Game engines provide a quick entry into game development allowing you to test out and build your own games in a nice sweet environment.
One such nice and sweet game engine is Unity which is loved by the indie game development community for being light and cute with a lot of cool features as well as being able to deploy to many platforms. You can make 2D games with it as well as 3D.

There are several other game engines out there in the wild as well.
Unreal Engine is yet another super popular engine for its ultra realistic graphics and several other awesome features.

But for this entry tutorial let us go ahead with Unity, since its lighter and quicker to get started with and doesn't take 50gb of your storage.
Let us begin.
Step 1: Making an account
Head over to this link and create an account. You will use this again later, and don't forget your credentials.
Step 2: Unity Hub
Go to this link and download the Unity Hub client. Once downloaded install it on your computer. The first time you run it you will be asked to login. Use the credentials you registered with in Step 1.
If it does not ask you to login in just click on the round avatar logo as shown in the picture below and press sign in.
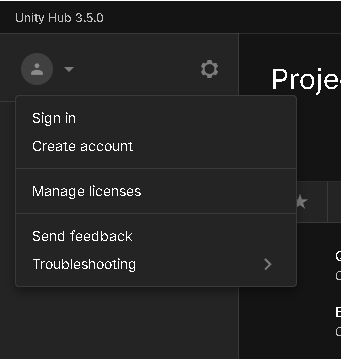
Once that is done, you'll need a personal license to get started. To acquire a free unity license, click on the Manage licenses button as seen in the above picture. In the dialogue box that appears you need to activate your free license.
Next, you'll need to download a version of Unity Editor to get started.
In the left panel of the Unity Hub select Installs and click Install Editor and choose the latest version of Unity.

In the dialog box that shows up you can choose to install Visual Studio Community or not by using the checkbox. If you have more than 8 gb of ram and a reasonably mid-range CPU, you can use this, or else I would recommend leaving this checkbox unchecked and use VS Code for scripting which you can download using this link as an alternative.

I already have Visual Studio installed here. The next section is called Platforms which allows you to download the modules to add support to export your game to those platforms.
Platforms refers to the operating system the game will run on.
You can leave all these unchecked if you're installing Unity on Windows or Linux or Mac.
Click Install. Now it's the waiting game. Depending on your internet bandwidth this could take 10 minutes or 200 years.
Step 3: Create a new project
Woohoo! Now you have all the tools ready to start building your game. As a simple example to get started let us build this super simple game called flappy bird in unity. You can check out the various clones of flappy bird on the google play store or play it on the browser here.
First open unity hub.
Click on New project in the top right corner.
You can now choose which template to use, in our case 2D Core should do. Select it and choose a project name in the Project settings section and select the location of where to save the project.

Now click on Create project. The first loading time for the project will be slightly longer but it will load quicker the second time and henceforth.

Boom! The unity editor has now created your new project, now we can get started for real.
Step 4: Intro to Unity's UI
You'll notice several tabs and boxes in the screen.
The bottom section has the tabs Project, Console, Animation and Animator.
The Project tab shows the project folder which you chose earlier when you created the new project. All the files and folders your game needs will be in this folder inside a folder called Assets.

The Console tab is to show errors and messages and warnings.
The animation and animator tabs are related to animation which we will get to in the next steps somewhere.
On the right you'll see a tab called Hierarchy. This section gives a list of all the things that are in each scene.

What is a scene you might ask, a scene where you work with content in unity. That means a scene will have 3D characters,3D environments, VFX and every effect that makes your game or experience look nice.When a new project is created unity creates a scene called Sample Scene which contains a camera and a light.
One scene could have one level, or your entire game could be built into one scene, it's up to you based on the complexity of the game.
For example, the main menu of your game could be one scene and the actual game could be in another scene. This allows you to group or categorise. There is more to it, but we will get to it in the next steps.
In the centre you'll see the Scene tab, this is where you will be working on the game. You'll see that there is just the main camera in the hierarchy and it is visible in the Scene tab as well. You can interact with the elements which is in the hierarchy in the scene.
Click on Main Camera in the hierarchy. Observe the Inspector tab in the right side of the screen. Each item in the hierarchy is called a GameObject. It is the base building block of a scene. Each GameObject has certain properties. For example, the main camera you selected has the properties called Transform , Camera and Audio Listener. These properties attached to a GameObject are called as components. The components define the properties and purpose of a GameObject. You can right-click in the Hierarchy tab and create an empty GameObject and you'll notice that the empty GameObject only has the Transform component. Unity has a big set of components you can add and you can write your own as well.

Now try holding the right click in the scene space and moving around, this allows you to pan across the 2D space.
You can click on anything and press the W key and you'll get some new coloured arrows on the screen. If you click on one of the coloured arrows and drag it, you'll notice the object will move as well. These arrows represent the X and Y axis. This is called the move tool. You can choose it from the floating tools bar as well. The floating tools bar also has tools to rotate, resize and scale GameObjects. Give it a try.

The items in the Floating tool bar can be used by pressing Q, W, E, R and T buttons respectively.
Now you know how to select something in the scene and how to move it around. You have also learnt how to navigate with the mouse and what each tab does. Let's get started with building our Flappy bird clone.
Step 5: Create the flappy bird on Krita
You can make your own textures on Krita which is a free alternative to photoshop. You can download it here. With the paint brush let us draw our own version of the iconic bird.

We can now use this amazing art in Unity. All you need to do is in Krita export the image as png to conserve the transparency. Next, drag the image and drop it into the Assets folder in the Project tab or you can copy and paste the image into the project location you picked when creating the project. Make sure all assets are inside the assets folder. As an alternative you can download an image from the internet as well.

You can create the obstacles as well in Krita and import it into Unity.

Step 6: Create a few C# scripts
Earlier in step 4 we spoke about components. Components give functionality to a gameobject. If you checked out the gameplay of flappy bird you'll notice that the bird keeps falling to the ground unless the player presses space or taps on the screen. This means that we need physics in our game. First we need to drag and drop the assets we made into the scene.

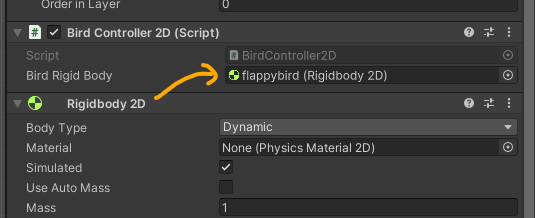
Click on the flappybird asset in the hierarchy. You'll notice a button called "Add Component" in the

bottom of the Inspector. Click on it. In the search bar type RigidBody 2d, choose it from the drop down list. Click on the play button to go into play mode.
Boom! Your bird now feels gravity. But we now need to control the bird as well.
In the Project tab, right click > Create > C# script. On creation rename it into BirdController2D.
Double click on it to open with your favourite text editor. You can use VS Code or Visual Studio or for this tutorial even Notepad will do.
This is what this new script will look like.
All the functionality has to be written after the first "{" and between the last "}".
The content between the curly brackets is called a code block.
using System.Collections;
using System.Collections.Generic;
using UnityEngine;

public class BirdController2D : MonoBehaviour
{
    // Start is called before the first frame update
    void Start()
    {

    }

    // Update is called once per frame
    void Update()
    {

    }
}
Before the void Start() add this line:
public Rigidbody2D birdRigidBody;Now in the code block below void Update() include these 3 lines.
if(Input.GetKeyDown(KeyCode.Space))
        {
            birdRigidBody.velocity = Vector2.up*4;
        }
Your code will now look like this:
using System.Collections;
using System.Collections.Generic;
using UnityEngine;

public class BirdController2D : MonoBehaviour
{
    public Rigidbody2D birdRigidBody;
    // Start is called before the first frame update
    void Start()
    {

    }

    // Update is called once per frame
    void Update()
    {
        if (Input.GetKeyDown(KeyCode.Space))
        {
            birdRigidBody.velocity = Vector2.up*4;
        }
    }
}
When you select a Bird object, under the BirdController2D you will see the items from the script show up in the inspector. You can drag and drop the RigidBody2d component of the Bird into the BirdController2D script. This way the script knows which component to control.
If you hit play now, the bird keeps falling but on tapping space the bird starts flying upwards.
Step 7: Pipes movement and collision

Remember the pipes? Right click on the pipe asset in the hierarchy and duplicate it. Select the duplicated pipe and set Z of Rotation as -180 in the inspector.
Create another script called PipeCollide and paste the follow content in that script.
using System.Collections;
using System.Collections.Generic;
using UnityEngine;
using UnityEngine.SceneManagement;

public class PipeCollide : MonoBehaviour
{
    private void OnCollisionEnter2D(Collision2D collision)
    {
        if (collision.gameObject.tag == "Player")
        {
            SceneManager.LoadScene("SampleScene"); //name of this scene

        }
    }
}
For this script to work you need to change the tag of the bird. Click on the Bird asset in the hierarchy and in the inspector choose Player from the drop down list named "Tag".
Select the pipes and add box collider 2d component.
Now if you hit play the pipes will stay where they are. So lets do something about that.

Make sure the parent of the pipes is in the center. In this example the parent is "Pipes" GameObject. Attach the PipeCollide script to the pipes.
Now let us make the pipes move. Create a new Script called PipesMove and put the following code in it.
using System.Collections;
using System.Collections.Generic;
using UnityEngine;

public class PipeMove: MonoBehaviour
{
    public float moveSpeed = 5;
    // Start is called before the first frame update
    void Start()
    {

    }

    // Update is called once per frame
    void Update()
    {
        transform.position = transform.position + (Vector3.left * moveSpeed) * Time.deltaTime;
        if (transform.position.x < -12)
        {
            Destroy(gameObject);
        }
    }
}
You have successfully made your pipes move to the left and the game to reload on collision. However, this is not how the original game works. In the original game, the pipes are generated automatically on the left side of the screen, and their vertical position is random. The game also has no end, as the pipes keep coming until the player loses. How can you make your game more similar to the original one?
Step 8: Create a spawner
Let us create a new script called PipeSpawner. Put the following code in that script.
using System.Collections;
using System.Collections.Generic;
using UnityEngine;

public class PipeSpawner : MonoBehaviour
{
    public GameObject pipe;
    public float spawnRate = 2;
    private float timer = 0;
    public float heightOffset = 1.4f;

    // Start is called before the first frame update
    void Start()
    {
        spawnPipe();
    }

    // Update is called once per frame
    void Update()
    {
        if (timer < spawnRate)
        {
            timer = timer + Time.deltaTime;
        }
        else
        {
            spawnPipe();
            timer = 0;
        }
    }

    void spawnPipe()
    {
        float lowestPoint = transform.position.y - heightOffset;
        float highestPoint = transform.position.y + heightOffset;

        Instantiate(pipe, new Vector3(transform.position.x, Random.Range(lowestPoint, highestPoint), 0), transform.rotation);
    }
}
Create an empty gameobject. Attach the above script to this gameobject. SInce the pipes have to spawn from the far right of the screen, place it out side the camera frame in the far right of the screen.

Remember the pipes and how you put them under an empty gameobject? Now select that gameobject from hierarchy and drag it to the Project window. The icon of the Pipes object will change to blue and a new item will appear in the Project window. This is the Pipes Object saved as a prefab, which is essentially a preconfigured gameobject which can be reused in the project. Since we are going to be spawning a lot of pipes its the ideal use case for us.
Now attach the Pipes object from the Project window into the pipe section in the PipeSpawner script.


Now if you hit play, the game must be playable, the bird is controllable, and the spawner creates pipes. Now we need the game to keep track of the score.
Step 9: Score
Right click in the hierarchy > UI > Canvas.
Once that is created right click on the newly created canvas and go to the inspector. Change render mode to Screen Space - Camera. Drag and drop the Main Camera from the Hierarchy to the Render Camera slot below it.

Right click on the Canvas in the Hierarchy > UI > Legacy > Text. You can adjust size, font and colour of the text in the inspector.
Let us change the text in the inspector to "Score". Create one more legacy text to display the text during the game.
Create an empty game object in the Hierarchy and call it UILogic. Create a script called UILogic and attach it to it. Copy the following code to that script.
using System.Collections;
using System.Collections.Generic;
using UnityEngine;
using UnityEngine.UI;
public class UILogic : MonoBehaviour
{
public Text score;
public void IncrementScore()
{
int scoreint = int.Parse(score.text);
scoreint++;
score.text = scoreint.ToString();
}
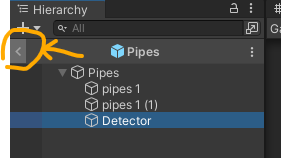
}We will need to edit the Pipes prefab which we created earlier. Double click on the Pipes prefab in the project window. This will allow you to edit the prefab in the Prefab Edit mode. Create a new empty game object and place it in between the 2 pipes. Let us also adjust the colliders of the pipes and the newly created empty game object. Let us call this new empty game object Detector. Select the detector and ensure Is Trigger check box is enabled.

When this is clicked you are in the Bounds Edit mode. A green boundary shows up in the scene Tab. Click on the green squares in the centre of each edge to adjust the size of the collider.


Create a new script called PipePoints and copy the following code into it.
using System.Collections;
using System.Collections.Generic;
using UnityEngine;
using UnityEngine.SceneManagement;

public class PipeCollide : MonoBehaviour
{
    private void OnCollisionEnter2D(Collision2D collision)
    {
        if (collision.gameObject.tag == "Player")
        {
            SceneManager.LoadScene("SampleScene"); //name of this scene

        }
    }
}
Attach the above script to the detector game object in the Pipes prefab. Head back to the scene. If you now hit play the game is now completely playable. You can adjust difficulty by changing the values in the PipeSpawner game object.
Step 10: Minor Adjustments
Let us change the background of the game by changing the background colour in the Main Camera. Let us also change the text colour of the score. If you want you can download your own fonts and add it.
Let us add an audio track as well. I am going to choose Corona by Alexander Nakarada.
Right click in Hierarchy > Audio > Audio Source. Drag and drop the mp3 clip into the AudioClip slot. Ensure the Play on awake checkbox is enabled.
Now your game has sound as well.
Conclusion
Congratulations. You have built your first actual game, although very primitive and with a lot of bugs, and edge cases to test, but nonetheless a good beginning. The purpose of this tutorial was to make a quick intro into making a game using unity and hence I haven't gone into the depth of the code. But I will be writing more posts on scripting in Unity and programming in general. Until then checkout the links in the next section and keep experimenting.
Happy Gaming!!
Links:
Unity Learn - Official tutorials and certifications for Unity.
Game Development Knowledge Bank - Check this out for some free sources for textures and audio and other assets as well as some tutorials

Comments